You've successfully flashed your device with a downloaded binary of Tasmota but now you need to connect the tasmotised device to your Wi-Fi network.
Using Web UI
Configure Wi-Fi
Tasmota provides a wireless access point for easy Wi-Fi configuration.
If you flashed using Tuya Convert this is the only option to set up your device.
 Connect your device to a power source and grab your smartphone (or tablet or laptop or any other web and Wi-Fi capable device). Search for a Wi-Fi AP named tasmota-xxxx (where x is a number) and connect to it. In this example the Wi-Fi AP is named tasmota-7718. When it connects to the network, you may get a warning that there is no Internet connection and be prompted to connect to a different network. Do not allow the mobile device to select a different network.
Wi-Fi manager server is active for only 3 minutes. If you miss the window you might have to disconnect your device from power and reconnect.
 After you have connected to the Tasmota Wi-Fi AP, open http://192.168.4.1 in a web browser on the smartphone (or whatever device you used).
Depending on the phone, it will take you to the Tasmota configuration page automatically, or you will get a prompt to sign in to Wi-Fi network or authorize. Tapping on the AP name should also open the configuration page.
After you have connected to the Tasmota Wi-Fi AP, open http://192.168.4.1 in a web browser on the smartphone (or whatever device you used).
Depending on the phone, it will take you to the Tasmota configuration page automatically, or you will get a prompt to sign in to Wi-Fi network or authorize. Tapping on the AP name should also open the configuration page.
 At this page you can have Tasmota scan for available Wi-Fi networks. Select the right network from the list or enter the following:
AP1 SSid - your Wi-Fi network name
SSID's are case sensitive
AP1 Password - password for your Wi-Fi AP
Wi-Fi password has to be under 32 characters and without special characters (e.g. asterisks) or white spaces
Recommended:
AP2 SSid - alternative Wi-Fi network SSID
AP2 Password - password for your alternative Wi-Fi AP
If you're not using a second Wi-Fi network you can enter an SSID without a password you can connect to as a backup in case something went wrong with your Wi-Fi credentials.
Click the checkbox to see the password you enter to ensure that it is correct and that your mobile device has not inadvertently capitalized the first letter if it is supposed to be lower case nor autocorrected what you entered. Double Triple check the Wi-Fi credentials and click on Save to apply the settings. The device will restart and connect to your home network. The tasmota-xxxx network will not longer be present. Therefore your smartphone will automatically be disconnected and should connect back to its data network.
Configure MQTT
Look in your router for a newly connected device with the same name as the Wi-Fi access point. (In this example tasmota-7718.)
If you don't have access to your router you can find your newly flashed device with an IP scanner:
- Fing - for Android or iOS
- Angry IP Scanner - open source for Linux, Windows and Mac. Requires Java.
- Super Scan - Windows only too (free)
- Tasmota Device Locator - Browser-based
Open the IP address with your web browser and you have full access to Tasmota.
Now is the time to set up MQTT and the last remaining, but equally important, step:
Configure module or template
Configure your device using Templates in Configuration - Configure Template or Modules in Configuration - Configure Module.
Your device running Tasmota is now ready to be controlled, automated or integrated in your smart home solution.
Using Serial Terminal
If you flashed the device using serial-to-USB adapter (or it is a NodeMCU/D1 mini) you can take advantage of the existing connection and configure your device over the serial connection using Commands.
First you will need a Serial Terminal program.
In this example Termite on Windows is used.
Download Termite and extract the .exe file, no installation necessary. Connect your serial-to-USB adapter or NodeMCU/D1 mini to the computer.

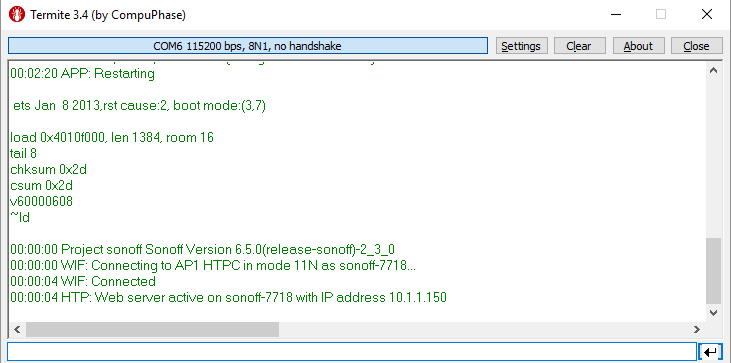
Open Termite and set it to the proper COM port (Termite selects the first available port by default). Set Baud rate to 115200 and Forward to none.

Connect your device to the serial-to-USB adapter. You should see the initial boot output in Termite.
If your screen is empty type status in the bottom command bar and hit enter. If you get a return message from your device similar to the one displayed under purple status you're all set.
To configure Tasmota you need to issue commands, some commands will reboot your device and to avoid that we will use the Backlog command feature.
Configure your Wi-Fi network and a secondary Wi-Fi network
Backlog ssid1 <yourssid>; password1 <your_password>; ssid2 <your_ssid2>; password2 <your_password>
Device will restart and connect to your network. It will display your devices newly assigned IP. Direct your web browser to that IP address to access the Web UI for further configuration and contol.
Configure MQTT broker address, MQTT credentials, unique device topic and OTA url to the latest official release
Backlog mqtthost <yourhost>; mqttuser <user>; mqttpassword <password>; topic <unique_topic>; otaurl http://thehackbox.org/tasmota/release/tasmota.bin
Keep your personal configuration in a text file and simply copy and paste the backlog commands to a newly flashed device.
Commands and Backlog are powerful and in time you can learn to configure almost everything (NTP servers, longitude and latitude, custom device options, etc) with a few copy and paste moves.
Your device is connected to your network and to the MQTT broker. One last thing to do is configure your device using Templates in Configuration - Configure Template or Modules in Configuration - Configure Module.